How to receive Zapier WebHooks over localhost
Please watch the video or read the tutorial below.
Introduction
Here we demonstrate how you can easily test webhooks within your Visual Studio web application, all while running your project on localhost. By using the Conveyor Visual Studio extension, we can get a public URL that tunnels direct to our web project.
We will be using Zapier simply as an example. You can of course use this as a guide for all other webhooks you might be using.
Zapier is a fantastic service that links together a large number of separate SaaS apps and communicates between them. Zapier also provide a WebHooks app allowing, amongst other things, to send a Web request to a specific URL along with the data.
For our example, we’ll be setting up a Zap that will notify us when a new email arrives to our Gmail account containing the subject ‘support-ticket’. Of course you can use these same instructions for setting up any other integration with Zapier – it’s certainly not limited to Gmail.
Create your web project
First things first, we need to create an empty Web Application with Web API in Visual Studio which we will use for receiving WebHooks from Zapier.
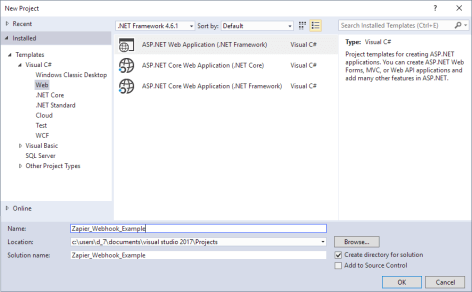
We don’t need to select Azure since we’ll be showing you how to open up IIS Express directly over the internet.

You will need to install the following Nuget package;
Microsoft.AspNet.WebHooks.Receivers.Generic
Then initialize the generic JSON webhook receiver in the WebApiConfig.Register method as below:
    public static class WebApiConfig
    {
        public static void Register(HttpConfiguration config)
        {
            // Web API routes
            config.MapHttpAttributeRoutes();
            config.Routes.MapHttpRoute(
                name: "DefaultApi",
                routeTemplate: "api/{controller}/{id}",
                defaults: new { id = RouteParameter.Optional }
            );

            // Initialize Generic JSON WebHook receiver
            config.InitializeReceiveGenericJsonWebHooks();
        }
    }
Set a secret key
To authorize the incoming webhooks request we set a secret key in the application settings like this;
        <appSettings>
        <add key="MS_WebHookReceiverSecret_GenericJson"
                value="z=80ad19e357b01a04fe767067df7cd31b96a844e1" />
        </appSettings>
Our WebHook URIs for Zapier will look like this
https://<host>/api/webhooks/incoming/genericjson/z?code=80ad19e357b01a04fe767067df7cd31b96a844e1
You will of course need to generate and use your own 'code' parameter. This will need to be between 32 and 128 characters and with a high entropy level. Please see the various online tools if you need help generating this or take a look at FreeFormatter online tools.
Configuring Generic WebHook Handler
Now we need to add the file, GenericJsonWebHookHandler.cs to the project. This will hold the following class which will handle the incoming Zapier webhook.
public class GenericJsonWebHookHandler : WebHookHandler
{
    public GenericJsonWebHookHandler()
    {

        this.Receiver = "genericjson";
    }


    [IgnoreAntiforgeryToken]
    public override Task ExecuteAsync(string generator, WebHookHandlerContext context)
    {

        // Get JSON from WebHook
        JObject data = context.GetDataOrDefault<JObject>();

        if (context.Id == "z")
        {
            // Received a WebHook from Zapier!
        }

        return Task.FromResult(true);
    }
}
Notice the use of the [IgnoreAntiforgeryToken] attribute, this is to allow 3rd parties (like Zapier or whoever) to send a POST to the API method.
Zapier’s WebHook Action
Next we just need to setup our ‘Zap’. As explained before, we’ll just be setting up a simple example using Gmail, but you can use these same steps no matter what apps you are integrating with Zapier. The webhooks can be setup in the same manner.
Start by going to your dashboard and select "Make a Zap":

For this tutorial I added the Gmail app and connected my Gmail account.

The trigger is set as a ‘new email matching search’. So when we receive a new email where the subject includes the matching term, in this case ‘support-ticket’, our trigger is fired.
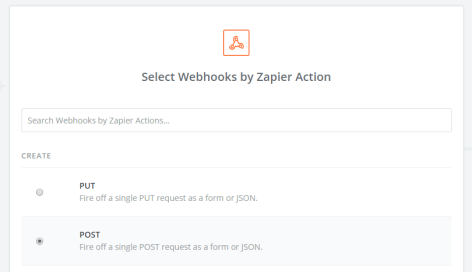
Webhooks by Zapier
Next we need to setup the Zapier webhooks POST.
Choose WebHooks by Zapier as the action app

And then POST as the action.
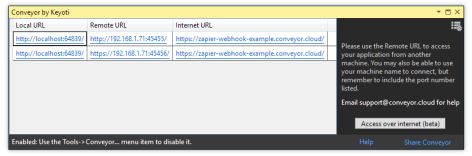
As we will be tunnelling to our IIS Express hosted application directly, we need to find the public URL for our project. This will be provided by the Conveyor Visual Studio extension.
If you haven’t already installed the Conveyor extension you can find instructions here.
So now go ahead and run your web application. The Conveyor window will appear. Click the Access over Internet button and register/login. Your internet URL will now be shown.
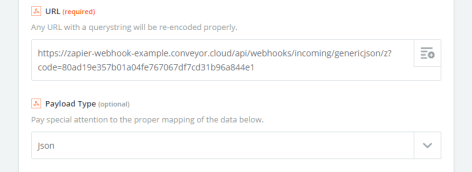
Simply set the webhook URL field in Zapier to the URI shown at the start of the tutorial, with the your Conveyor Internet URL as the host name;
https://<Conveyor-Internet-URL>/api/webhooks/incoming/genericjson/z?code=80ad19e357b01a04fe767067df7cd31b96a844e1
and set the Payload Type to ’json’:
Now you can either setup a test email from within Gmail and carry out a test run on Zapier (please see notes below first), or name your Zap to finalise the setup.
Trying it Out
Before you test your new Zap you will need to make sure your Visual Studio application and Conveyor are running. When logged in to the Conveyor Cloud service you will see your Internet URL displayed in the Conveyor window. If this ever changes you will need to update your Webhooks by Zapier action accordingly.
Breakpoint
If we add a breakpoint to our code, as shown below, we can then see the webhook in action.
To trigger our Zap, send an email to Gmail with the subject line ‘support-ticket’. To speed things up, you can always manually run your Zap, otherwise you will have to wait for the next time Zapier runs automatically.

And that’s it. You should now find you can test your Zapier webhooks directly from your machine on localhost, without having to deploy your application to a cloud service.