How to install the Visual Studio Extension
Conveyor can be installed directly from Visual Studio.
Watch the video or follow the steps below.
Step 1:
Download directly within Visual Studio by searching for 'Conveyor' in the Tools->Extensions and Updates dialog(or download from the Visual Studio Marketplace).
Step 2:
After you restart Visual Studio, Conveyor will check your firewall ports and open a helper application if needed, or advise what changes need to be made (see below for manual instructions).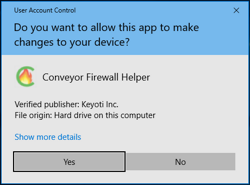
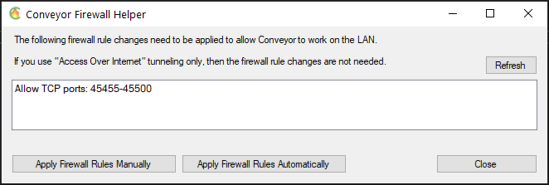
Allow the application to run and click "Apply Rules Automatically" if you agree to the changes (Visual Studio must not be blocked and ports 45455-45500 need to be open).
Step 3:
Conveyor is automatically enabled for web application projects, run (debug) a project and note the Remote URL, that is the URL you will use from your device or other computer. Please see troubleshooting below if you don't see the Conveyor window.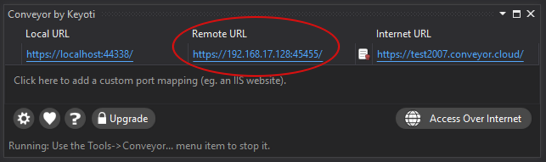
Step 4:
Use the Remote URL from your device (phone, tablet or other machine) to directly access your application. Note that you must be running the project in Visual Studio for the Remote URL and Internet URL to work.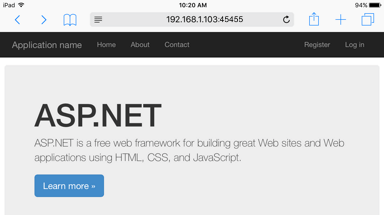
TLS/SSL
The "Access over internet" tunnel service has it's own properly trusted certificate, so no setup is necessary. However, the Remote URL (for access over the LAN) runs with a self-signed certificate. To properly access the Remote URL from other machines/devices you just need to install Conveyor's CA certificate on your device, please click the certificate icon in the URL grid for instructions.
Manually configuring your firewall
Add an inbound firewall rule allowing access to the TCP port given in the Remote URL.- Open Windows 'Start' and type WF.msc.
- Click 'Inbound Rules' on the left.
- Click 'New Rules' on the right.
- Choose 'Port' in the new dialog, then 'Next'.
- Select TCP, and enter the port from the Remote URL next to 'Specific local ports' (45455-45500), then 'Next'.
- Next, and next (you may want to disable 'Public'), give it a name like 'Conveyor: web dev server access enabled'.
Troubleshooting
- Cannot enable: If you have installed Conveyor previously and it is now disabled, please see https://stackoverflow.com/questions/35203647/updating-visual-studio-2015-extensions-end-up-disabled you can get the tool mentioned, here https://github.com/remcoros/DuplicateExtensionFinder/releases/download/v1.2/DuplicateExtensionFinder.exe and run it with "DuplicateExtensionFinder.exe -delete"
- Cannot enable (administrator usage): If running VS as administrator, and Conveyor isn't enabled (the Tools menu item is deactivated) you will need to go to "Tools | Options | Environment | Extensions and Updates" and check "Load per user extensions when running as administrator".
- Invisible tool window: If the Conveyor window doesn't appear, please restart Visual Studio and try running the project again (if it still won't work, resetting your VS settings should fix it Tools->Import and Export Settings Wizard->Reset all settings->select “No, just reset settings, overwriting my current settings”->Choose a Default Collection of settings).
- Closed the window: You can reopen the Conveyor window by going to Tools->Conveyor to disable it, and then repeat to re-enable it - the next time you run the project the Conveyor window should appear.
- SSL: The first time you run a project using HTTPS you will be prompted to install our testing certificate, this is normal and you should allow it for more stream-lined experience (otherwise you'll be warned by the browser not to visit your web app).
- IP address: If connections to the remote URL provided by Conveyor do not work (eg timeout), please try using a different IP address for your machine (use CMD and type ipconfig to see IP addresses). In addition please ensure you have opened the port on your local firewall and check that access to Visual Studio is not blocked by a firewall rule.
- Android emulator: If you cannot connect to the remote URL from an Android emulator then please try using the IP 10.0.2.2 with the Conveyor provided port number, eg. https://10.0.2.2:45455/
- Firewall: Check there are no BLOCK firewall rules that are overriding your ALLOW rule. By default, BLOCK overrides.
- If Conveyor cannot find any web projects (when you run the project), please send a screen shot of your solution structure to support@conveyor.cloud so we can investigate.
- Windows 7: You need to enable TLS 1.2 please see https://help.runbox.com/enabling-tls-1-2-on-windows-7/
Technical support is available by emailing support@conveyor.cloud
How to install the Conveyor CLI Tool


Step 1: Install .NET 6 (or higher) runtime
Unless you already have .NET 6+ (Runtime or SDK):
Download and install it from the .NET download page under ".NET Runtime 6.x.x"
Or run in an administrator command prompt
winget install Microsoft.DotNet.Runtime.6
Step 2: Download conveyorcli
curl https://conveyor.cloud/win/conveyorcli.exe -o conveyorcli.exe
Step 3: Put it somewhere on your path
You can use it where you placed conveyorcli.exe or add it to your path environment variable (this opens the environment variables GUI)
rundll32 sysdm.cpl,EditEnvironmentVariables
Step 4: Create a tunnel
You will need to register for a tunneling account first, if you wish to create an internet tunnel.
-
Store your tunnel account credentials if you wish to use tunneling
conveyorcli config -s -
Start conveyorcli, eg. to create a tunnel to https://localhost:443
conveyorcli -p 443...or to create a tunnel to http://localhost:80 (the extra 'i' means use http)conveyorcli -p 80i...or to create tunnels to http://localhost:80/, https://localhost:443/ and https://localhost:8080/conveyorcli -p 80i,443,8080...or to create a tunnel to https://localhost:1234 with subdomain 'abc' (if that subdomain is available and you have the appropriate tunneling plan).conveyorcli -p 1234 -s abc
Step 1: Install .NET 6+ runtime
Unless you already have the .NET 6 (or higher) (Runtime or SDK) please install by running the command:
        sudo apt-get update
        sudo apt-get install dotnet-runtime-6.0
Step 2: Download conveyorcli and make it executable
For x64 CPUs
        wget https://conveyor.cloud/lin/conveyorcli
        chmod +x conveyorcli
For ARM64 CPUs
        wget https://conveyor.cloud/linarm/conveyorcli
        chmod +x conveyorcli
Step 3: Put it somewhere on your path, eg.
sudo mv conveyorcli /usr/local/bin
Step 4: Create a tunnel
You will need to register for a tunneling account first, if you wish to create an internet tunnel.
- Store your tunnel account credentials if you wish to use tunneling
conveyorcli config -s -
Start conveyorcli, eg. to create a tunnel to https://localhost:443
conveyorcli -p 443...or to create a tunnel to http://localhost:80 (the extra 'i' means use http)conveyorcli -p 80i...or to create tunnels to http://localhost:80/, https://localhost:443/ and https://localhost:8080/conveyorcli -p 80i,443,8080...or to create a tunnel to https://localhost:1234 with subdomain 'abc' (if that subdomain is available and you have the appropriate tunneling plan).conveyorcli -p 1234 -s abc
How to install the Conveyor Standalone GUI Tool
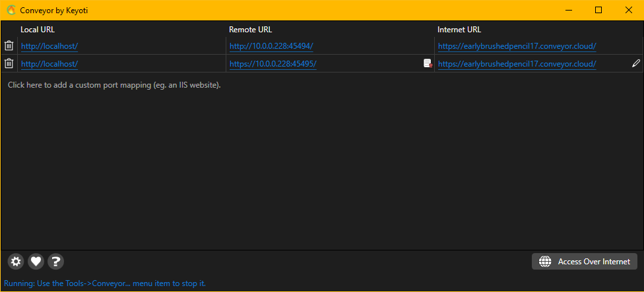
The standalone tool sits in your Windows system tray, can start automatically with Windows, and also accepts custom port mappings.
It is available only with the Pro upgrade.
Step 1: Download and install the MSI
Download the MSI from here however please note that you must purchase the Pro upgrade to use it.
Step 2: Run it from the Start menu
Type "Conveyor" in the Windows search bar, or find Conveyor in the Start menu list.
Step 3: Configure it
Conveyor Standalone will automatically live in your system tray while it is running, use the gear icon to make it start automatically with Windows. It will also automatically detect IIS Express websites that are running, but you can also setup your own ports to forward to by clicking "Click here to add a custom port mapping" and entering the port your website is running under. Clicking "Access Over Internet" will create a public URL using the Conveyor Tunnel service.